Open topic with navigation
Manage Assignments
Assignments are an important way to understand when people have indicated their intention to attend an event. They are generated manually, through Mass Action, via Check-in or through event registration forms. There are two actions you can take to manage assignments:
- Move Assignments—allows you to find all participants assigned to a particular activity, activity schedule, group, room/location/class (RLC) or breakout group and move them as a group to a brand new assignment.
- Remove Assignments—allows you to find all participants assigned to a particular activity, activity schedule, group, room/location/class (RLC) or breakout group and completely remove the assignment.
Move Assignments
When you need to move a group of participants from one assignment to another, you can use the tool. For example, when the school year ends you need to promote your children's assignments to the next class or age level, or you may need to promote a group of people to a different assignment when a new class forms.
Tip! Always work from the oldest age group back to the youngest or from the last class in a series and work back to the first. This ensures you have a clean RLC to move a group of participants into. For example, move High School seniors (12th Grade) first, then work down all the way to preschool. This practice means that you need to work with other ministries during the move process.
Move Assignments also works very well with Event Registration forms. In some cases you will not know which RLC a person needs to be assigned to until just before the activity. This is especially true for activities like summer camp or weekend retreats where participants are assigned sleeping arrangements. You can create an RLC for your activity that is a temporary holding room. When you know which lodges/hotels/tents will be available, you can create the proper RLCs and then use Move Assignments to move participants to the correct location.
A final great use for Move Assignments is to add to an existing assignment. Essentially, you are moving participants into the same RLC, but you are adding to it - for example, adding a Breakout group or adding an activity schedule.
Note: You must have Ministry Write security access to at least one ministry to perform the following procedure.
To move assignments:
- Click Ministry > Assignments > Mass Change. The Manage Assignments form appears.
- Search for the current assignment for participants you want to move. First select the Ministry and Activity from the drop-down lists under the Current Assignments box.
- Select one of the following from the Activity Schedule drop-down list:
- All—(typical choice if you do not record schedules with assignments) finds all participants regardless of whether they do or do not have a schedule assignment.
- None—find all participants who do not have an assignment to a schedule.
- Specific schedule (typical choice if you record schedules with assignments)—choose one of your defined schedules to find all participants who have an assignment to that schedule.
- Select one of the following from the Room, Location, Class drop-down list:
- All—find all participants regardless if they do or do not have an assignment to a roster.
- None—find all participants who do not have a roster assignment.
- Specific room/location—(typical choice) choose one of your defined rosters to find all participants who have an assignment to that roster.
- Select one of the following from the Breakout Group drop-down list:
- All—find all participants regardless if they do or do not have an assignment to a breakout group.
- None—find all participants who do not have an assignment to a breakout group.
- Specific breakout group—(typical choice if you are using breakout groups) choose one of your defined breakout groups to find all participants with an assignment to that breakout group.
- Next, select the assignment to move the participants to. Select the Ministry and Activity from the drop-down lists in the Move to Assignment box.
- Select one of the following from the Activity Schedule drop-down list:
- Unchanged—retain each participant's assignment to an activity schedule (or no assignment to a schedule).
- None—remove each participant's assignment to an activity schedule.
- Specific schedule—choose one of your defined schedules. After the move is completed, the new assignment will include the selected schedule.
- Select one of the following from the Room, Location, Class drop-down list:
- Unchanged—retain each participant's assignment to a roster.
- None—remove each participant's assignment to a roster.
- Specific room/location—(typical choice) choose one of your defined rosters. After the move is completed, the new assignment will include the selected roster.
- Select one of the following from the Breakout Group drop-down list:
- Unchanged—retain each participant's assignment to a breakout group.
- None—remove each participant's assignment to a breakout group. This is also the option that will appear if the assignment you are moving to does not use breakout groups.
- Specific breakout group—(typical choice if you are using breakout groups) choose of your defined breakout groups. After the move is completed, the new assignment will include the selected breakout group.
 Moving assignments from one roster to another
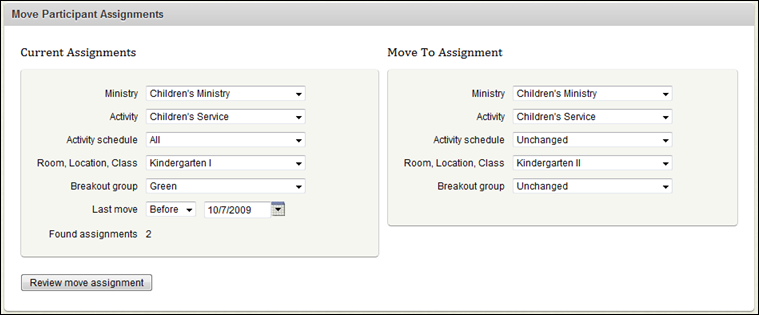
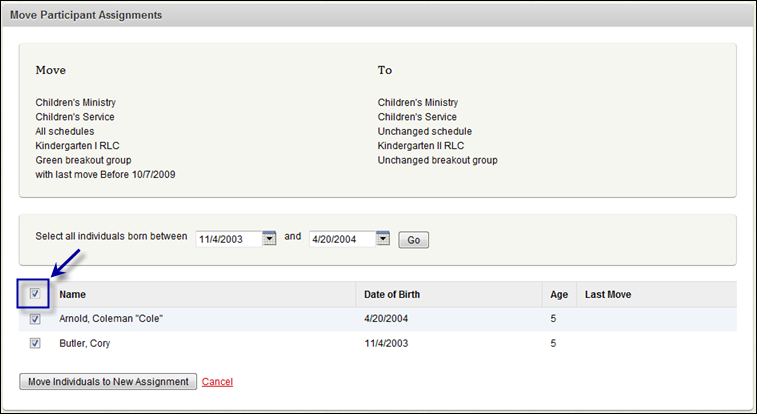
- Click Review move assignment. The list of participants appears.
- Optionally, if you want to display a subset of the returned list, change the birth date range and click Go. Participants born between the dates appear with a selected check box beside each name.
- Select the check box in the header bar to select all of the participants, or select check boxes by individual participants to move. If you do not want to move the participant's assignment, ensure that the check box is clear.
Move assignments
- Click Move Individuals to New Assignment. A confirmation message appears listing each participant's assignment that was moved.
- Click Back to move another group of participants.
Remove Assignments
Assignments are useful for current events and activities that are occurring. They let you know who has indicated that they intend to attend. Once an event has passed, assignments are not as helpful. Attendance becomes more important as you look at a person's involvement in church functions.
What do you do with all these old assignments? A helpful feature of Move Assignments is the ability to completely remove assignments that are no longer needed.
To remove an assignment:
- Click Ministry > Participants > Manage Assignments. The Move Participant Assignments form appears.
- Search for the current assignment for participants you want to move. First select the Ministry and Activity from the drop-down lists under the Current Assignments box.
- Select one of the following from the Activity Schedule drop-down list:
- All—(typical choice if you do not record schedules with assignments) finds all participants regardless of whether they do or do not have a schedule assignment.
- None—find all participants who do not have an assignment to a schedule.
- Specific schedule (typical choice if you record schedules with assignments)—choose one of your defined schedules to find all participants who have an assignment to that schedule.
- Select one of the following from the Room, Location, Class drop-down list:
- All—find all participants regardless if they do or do not have an assignment to a room, location, class (RLC).
- None—find all participants who do not have an RLC assignment.
- Specific room/location—(typical choice) choose one of your defined RLCs to find all participants who have an assignment to that RLC.
- Select one of the following from the Breakout Group drop-down list:
- All—find all participants regardless if they do or do not have an assignment to a breakout group.
- None—find all participants who do not have an assignment to a breakout group.
- Specific breakout group—(typical choice if you are using breakout groups) choose one of your defined breakout groups to find all participants with an assignment to that breakout group.
- Select the Remove radio dial.
Remove
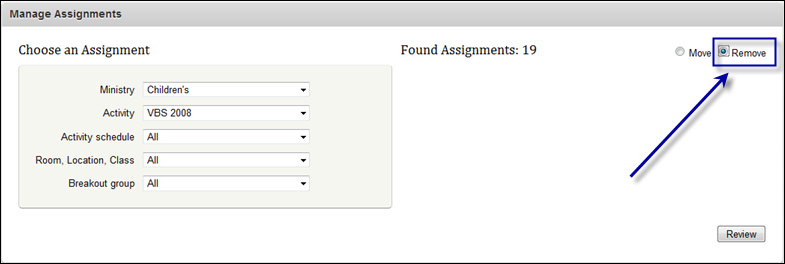
- Click Review. A list of all individuals with the selected assignment appears.
- Do one of the following:
- Click the check box in the header bar of the list to select all individuals.
- Select the check box beside each individual to work with.
- Click Yes, remove this assignment.